


File upload is a very common feature that almost every website needs, but managing these file uploads in the backend can be a bit tedious. When a web client uploads a file to a server, it is generally submitted through a form and encoded as multipart/form-data.
So now we have gotten the file and sent it to our backend, now the question that arises is Where do we save it?🤔
This is where a CDN comes to the rescue!😀
What is a CDN?
Content Delivery Networks (CDNs) provide end-users with fast digital experiences by serving static assets like HTML pages, javascript files, stylesheets, images, and videos from the “edge” of the internet closest to them.🤯
Sounds cool, doesn't it?
But in our case we just want to store images, so wouldn't it be awesome if there was a CDN optimized for storing and delivering images and videos.🙃
That's where Cloudinary comes in the fold!
Cloudinary provides cloud-based image and video management services. It enables users to upload, store, manage, manipulate, and deliver images and video for websites and apps.🤯🤯
Now let's get our hands dirty with Cloudinary!
Step 0:
Creating the Cloudinary account.
- First things first, we need a Cloudinary account. This is quite straightforward go to their sign up page and sign up!
- Once you are successfully signed up you will be taken to the dashboard where you will find your account details(This will be useful later).
Step 1:
Setting up our backend.
- We are going to use NodeJS as our backend.
- Set up a simple NodeJS project with ExpressJS, Cloudinary, and cors packages installed
npm i express cloudinary cors
Step 1.5:
Setting up the ExpressJS server
- We are going to keep it simple with the ExpressJS part since that's not our main focus for today.
Create a index.js file and add the following code
const express = require('express');
const app = express();
var cors = require('cors');

app.use(cors());

app.post('/api/upload', async (req, res) => {

});

const port = process.env.PORT || 8000;
app.listen(port, () => {
    console.log('listening on 8000");
});
- You may have noticed the post endpoint, it's where we are going to get our image file.
Step 2
Configuring Cloudinary
- Remember the Account Details we saw on the dashboard of Cloudinary?
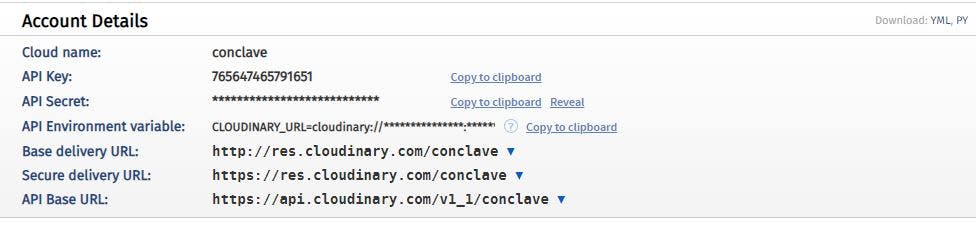
- We are going to need the cloud name, API key, and API secret to configure our Cloudinary.
Create a cloudinary.js file and add the following code
const cloudinary = require('cloudinary').v2;
cloudinary.config({
    cloud_name: process.env.CLOUDINARY_NAME,
    api_key: process.env.CLOUDINARY_API_KEY,
    api_secret: process.env.CLOUDINARY_API_SECRET,
});

module.exports = { cloudinary };
- We can supply these values using environment variables.
Step 3
Connecting ExpressJS with Cloudinary
- We have set up our ExpressJS server and we have Configured our Cloudinary!
- What's next? Connecting them together of course.
Import cloudinary into the index.js file.
const { cloudinary } = require('./cloudinary');
Add the middleware for parsing json and set the limit to 5mb.
app.use(express.json({ limit: '5mb' }));
- Now we have connected Cloudinary and Express, the next step is to set up the endpoint and we can start uploading files!
Step 4
Setting up the end point
- Files that we receive in the backend can be in two formats, either they are sent as form-data or they can be base64 encoded and sent as a string.
- Base64 encoded image makes handling the file simple for us as we can deal with it like any other long string and upload to Cloudinary quite easily.
- However, we are not going to do it that way as base64 encoding makes file sizes larger than their original binary representation.
- So we are going to go for the form-data approach and for this we need Multer.
- Install Multer and create a config file for Multer.
npm i multer
create a multer.js file and add the following code.
const multer = require("multer");
const path = require("path");

module.exports = multer({
  storage: multer.diskStorage({}),
  fileFilter: (req, file, cb) => {
    let ext = path.extname(file.originalname);
    if (ext !== ".jpg" && ext !== ".jpeg" && ext !== ".png") {
      cb(new Error("File type is not supported"), false);
      return;
    }
    cb(null, true);
  },
});
- Here we have added a filter for only jpg and png files.
- Now we can import this in our index.js and we can set up our endpoint.
const upload = require("./multer");
Add the following code to the "/api/upload" end point that we created earlier.
router.post("/api/upload", upload.single("image"), async (req, res) => {
  try {
    // Upload image to cloudinary
    const result = await cloudinary.uploader.upload(req.file.path);
    console.log(result)
  } catch (err) {
    console.log(err);
  }
});
- Now the image has been uploaded to Cloudinary and we get the following object as the result.
{
 access_mode: "public",
 asset_id: "c3d4fdcf93d5513fd1a3b586cb54d41f",
 bytes: 18542,
 created_at: "2021-06-04T19:29:23Z",
 etag: "4e96f1110cb872407e837d4fc1440f96",
 format: "png",
 height: 816 ,
 original_filename: "opengraph",
 placeholder: false,
 public_id: "s5obodylaavkczs9lgk3",
 resource_type: "image",
 secure_url:
  "https://res.cloudinary.com/conclave/image/upload/v1622834963/s5obodylaavkczs9lgk3.png",
 signature: "e7a2a688ed4d531e475f8769cfb2f96173143fc8",
 tags: [],
 type: "upload",
 url: "http://res.cloudinary.com/conclave/image/upload/v1622834963/s5obodylaavkczs9lgk3.png",
 version: 1622834963,
 version_id: "f2dabc64690671053103602d88b14581",
 width: 816.
}
- The URL and public_id are the 2 things of interest for us.
If we have a database we will be storing both the URL and public_id.
- The URL is the thing we send to the frontend to load the image there.
- And the public_id helps us to delete the image in the future.
And we are done! Our image has been successfully uploaded into Cloudinary!! 😀
Bonus
Let's delete the image
router.delete("/api/delete/:public_id", async (req, res) => {
  try {
    // Delete image from cloudinary
    await cloudinary.uploader.destroy(public_id);
  } catch (err) {
    console.log(err);
  }
});
And as simple as the image is deleted on Cloudinary. 🔥
Cheers! and with that, we have set up a backend for uploading and deleting images on Cloudinary🥳.
You can go through the documentation for Cloudinary over here